
Animating with Photoshop
Page 1 of 1

20110715
Animating with Photoshop
This is my first tutorial so bare with me...
This is a simple animation to get use to creating new frames and timing.
Firstly you need to create an image you want to animate mine will be this image and i am going to animate the text.

Open up your image make sure it is a not a flattened image and that you can still move your layers about freely.
Then click window in the navigation bar and select animation from the drop down menu.
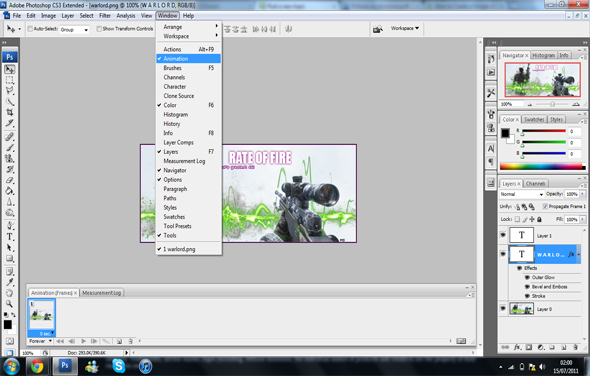
As we can see the animation bar below the image has now appeared.
Next step is to create a new frame this means click this icon highlighted and a new frame will appear.

Make sure the 2nd frame is high lighted you can now move your text into a different position on you image or do what you like to the text change the colour but for this i will move it.
You then repeat this step moving the text to a different place on your image creating a new frame for each new movement of the text.
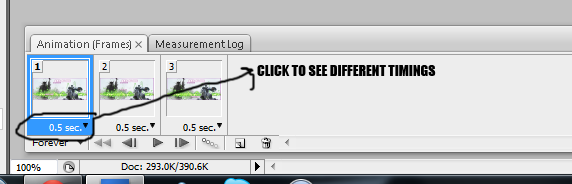
After you have created all the frames you want you are ready to add a timing to them depending on how fast or slow you want it to move. See here in the image you can see number just below the frames this is the timing of the frame on how quick or slow you want the text to move onto the next frame experiment with the timing see what you like you just click the play button below the timings.
To save the image click file ans scroll down to save for web and devices and click save in right hand corner make sure it states your are saving as a GIF file, and your are ready to upload to the net.

Final product
Hope you understand this my first try.
This is a simple animation to get use to creating new frames and timing.
Firstly you need to create an image you want to animate mine will be this image and i am going to animate the text.
Open up your image make sure it is a not a flattened image and that you can still move your layers about freely.
Then click window in the navigation bar and select animation from the drop down menu.
As we can see the animation bar below the image has now appeared.
Next step is to create a new frame this means click this icon highlighted and a new frame will appear.
Make sure the 2nd frame is high lighted you can now move your text into a different position on you image or do what you like to the text change the colour but for this i will move it.
You then repeat this step moving the text to a different place on your image creating a new frame for each new movement of the text.
After you have created all the frames you want you are ready to add a timing to them depending on how fast or slow you want it to move. See here in the image you can see number just below the frames this is the timing of the frame on how quick or slow you want the text to move onto the next frame experiment with the timing see what you like you just click the play button below the timings.
To save the image click file ans scroll down to save for web and devices and click save in right hand corner make sure it states your are saving as a GIF file, and your are ready to upload to the net.
Final product
Hope you understand this my first try.

Guest- Guest
Share this post on:
Permissions in this forum:
You cannot reply to topics in this forum|
|
|